This tutorial will explain how to setup and configure a DDoS protected Website. This guide assumes you a web server and domain at the ready. This article assumes that you have the required access to update your domain name servers as well as the IP address of your backend web server (to be protected).
Step 1: Backend Setup
Setup your website on your server, this server will be from here on referred to as the "backend server". On the backend server you may use whichever Operating System you are most familiar with, however if unsure we recommend Debian Linux or cPanel.
Please ensure that the website is running and connectible on the backend server.
Step 2: Purchase DDoS Protection Service
Pick a suitable package from the DDoS protection page. We suggest choosing one geographically close to your server location (or your primary user base). We offer numerous locations in the United States and Europe.
During the purchase process you will be asked to:
- Name your service (important if you plan to have many)
- Select the filtering location (choose a location close to your backend server)
- Select an appropriate DDoS protection threshold (choose a value big enough to handle your expected attacks)
- Select the amount of Clean Bandwidth required to run your service (not attack traffic)
Websites can significantly benefit from the Anycast Product line for extra redundancy, protection and website loading performance.
Step 3: Encapsulation Setup (Optional)
This step is only required if you are intending to use a GRE, IP-in-IP or IPSec Tunnel. If you are intending to use a Reverse Proxy (RP) style connection (the easiest) then you can skip this step.
With HTTP Services the connecting clients IP is always available via the Layer 7 Client IP Forwarding technoligies. Encapsulation (such as with GRE) is usually not required but remains useful for additional security and for other more advanced applications.
An encapsulated backend requires support on the Backend Server, currently Windows and Linux Operating Systems are fully supported, with partial support for FreeBSD. Most Enterprise or even SOHO Routers also support GRE or IP-in-IP tunneling, if supported you may be able to configure the router to terminate the encapsulated network.
Encapsulated networks can be created from your services "Tunnels" page, the link for which can be found in its Action menu. To create a Tunnel you need to specify the backend servers IP address, as well as depending on the encapsulation type chosen security keys (GRE) or passphrases (IPSec PSK). If unsure as to the appropriate encapsulation type we recommend using GRE. Alternatively to the form in your dashboard you may also use the form below to create a tunnel, just input details for your backend server and select your service.
We provide scripts / software to install the encapsulated tunnel onto your backend server in the Dashboard. On your services Tunnels page you should see the list of tunnels which have been created. In the Action menu for the tunnel there is a page titled "Setup Tunnel", here you can download the provided Linux setup script, or the Windows tunneling software with your configuration built-in.
Step 4: Add Ports
Add the ports required to run your service. In this case, the default port for HTTP servers is port 80 (All HTTP traffic occurs over TCP). If unsure you can determine what port(s) the service bound to by using the ss or netstat commands as appropriate.
There is a form in the dashboard for creating ports, this can be found in your services Action menu as the "Ports" page. To add a port click the "Add Port" button towards the bottom of the page. Then fill the created form with the values you can see below in the example / integrated form. Alternatively, you can also use the form below to create the port for your service, just configure the appropriate backend by either:
- Selecting the Encapsulated Type, and then the appropriate Tunnel (as created in Step 2); or
- Entering a Backend IP address for a Reverse Proxy style port.
You may also wish to add port 443 (HTTPS). First add this port, making sure to select HTTPS as the port protocol. You will then need to configure a SSL certificate for the port from the port Action menu via Action > SSL. For more information on HTTPS and SSL see this article.
If you have a region field on your service (Anycast services) then for most configurations this should be All.
If you have HTTPS configured on your web server and wish for the backend connection to be made over SSL then select the padlock in the backend section and use the SSL port (most likely 443). Otherwise you may point the port at your backend server with a backend port of 80 (no padlock selected). An example of a setup can be seen in the interactive form below.
Step 5: DNS
For this step you may use either our DNS service or a third party DNS provider. In either case the aim is point your website (via DNS) at the DDoS Protected IP address. This step assumes you are configuring a domain name, if this does not apply you may skip this step (or replace it).
For more information on DNS see this article on the basics of DNS.
Option 1: X4B DNS
Our provided DNS hosting is available as the DNS page in the dashboard.
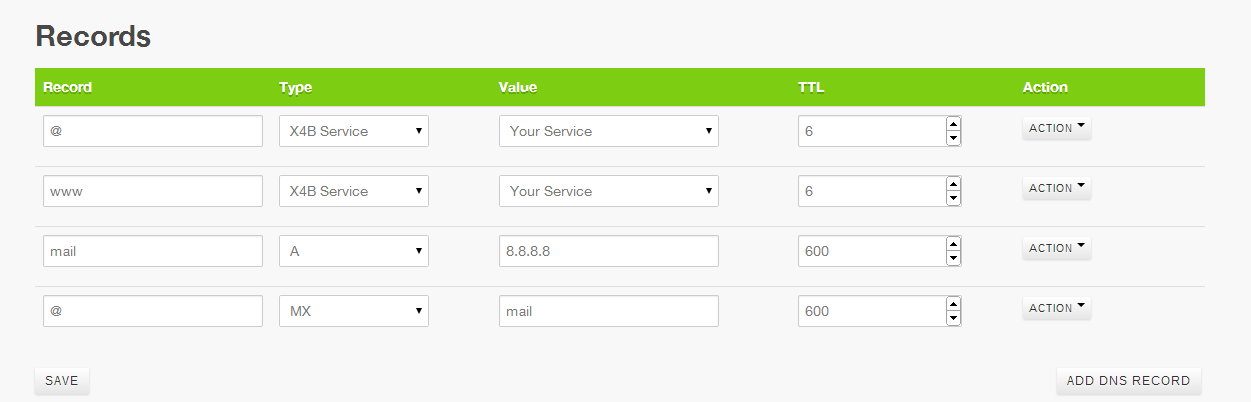
Step 1 to configure your domain using the provided DNS is to create a zone for your domain. Step 2 is to add appropriate records to point you domain and subdomains to your protected IP. A simple configuration could look something like below. Be sure to setup all subdomains.
After you configure your domain in order for the changes to be used you must point your domain at the nameservers listed (NS1.X4B.NET and NS2.X4B.NET). Changes take a minute or two to be applied world-wide. If you wish you can use dig to test all zones before making any domain changes.
You will need to configure your domain name to use our nameservers, these can be found in the DNS Management page of the Dashboard.
Option 2: Third Party DNS Provider
You can find the options required for configuration on the service Overview page (Action > Overview). You will need to enter these settings into your provider. If you have a single homed service you may alternately be able to use the proxy IP in A records directly but certain features will not be available.
Unfortunately we are unable to provide tutorials for all Registrars and 3rd Party DNS services. If you are unable to find the one you need then you will need to extrapolate the values provided on the Information Page or on the Page after purchase as needed.
We recommend reviewing the tutorial for another company as it may provide the insight you require. Your Nameserver company / service may have help resources that can assist you in this matter.
If you need assistance related to our services, or information not specific to the 3rd party service you have chosen feel free to ask our friendly staff via a Support Ticket. While we likely can't help you with the specifics of your registrar, phrase us a generic question (i.e "I have the options X and Y which do I need") and we can likely help.
Step 6: Finish & Test
Once all steps are completed and the progress bar for deployment of the configuration reaches 100% you should be able to connect to your website on your Filtered IP.
This Filtered IP is the address that you should use in any DNS names, or supply to any connecting users. All traffic which arrives at configured ports on a Filtered IP will be filtered for attack, and then forwarded to your configured backend server.
Note: If you (or your network provider) run a firewall either ensure the Backend Communication address (unless otherwise specified, your filtered IP) is whitelisted or that the firewall is disabled.
Additional Information
Additional Headers
Layer 7 headers exist that provide information on:
- the request Scheme
X-Scheme - the source server
X-Source - the client IP
X-Real-IP(can be overridden) - the request UUID (disabled by default)
Apache 2 compatibility
If you are using Apache 2.4.65 or later as your backend server with a backend of HTTPS you will need to have the backend SNI Pool mode set to "SNI Pool" for compatibility. This is because Apache2 2.4.65+ enforces SNI on all HTTPS connections. When creating a port with a HTTPS backend server the default is to set this automatically. For existing ports you can change this in the HTTP Options section of the port configuration as detailed in the HTTP Options documentation.
Frequently Asked Questions
Help I can't connect to FTP! or how do I connect to SSH?
Connect to your non-public services using your normal, non DDoS protected backend IP. You can also choose to forward FTP or SSH over the protected IP, but this is not recommended. By restricting access to targeted brute force or exploit attacks you gain a significant amount of security.
Can I use third party Web Accelerator services with this protection?
We do not officially support any third-party web accelerator services (such as CloudFlare). At the very least to prevent mitigation issues ensure that the Accelerator service supports HTTP Keepalive and that the appropriate settings for Client-IP forwarding are configured in the HTTP Options section of the X4B port interface.
Enhanced HTTP Filtering is not compatible with any form of Web Accelerator service.
How do I get the real IP of a visitor to my website?
When using a Layer 7 reverse proxy service the connection will originate from an appropriate backend communication address on our end. We will provide the connecting clients "Real IP" in an HTTP header, in our case we use the X-Real-IP header. You can find an article on this and some example set up instructions for various web servers here.
How many domain names (or other resource) can I configure?
All resources are fair use with high limits you are unlikely to ever see.
What ports can I use? Can I access the IP directly or do I need a domain name?
Yes. The filtered IP we provide is your IP, you can setup the service however you desire and use the service (within the terms of the AUP/TOS) however you like. Any restrictions enforced by us (outside of fair use) are minimal and largely driven by technical limitations.